升级 SSH 引发的程序连接异常及解决全记录
前言
由于现网要做安全整改,旧版本的OpenSSH和OpenSSL存在安全风险,为提升服务器的安全性和稳定性,需要对其进行升级。
本文将详细讲述升级后,程序连接出现异常的情况,以及排查和解决问题的全过程
安装说明
安装环境虚拟机环境
OpenSSH版本
OpenSSL版本
升级前
linux CentOS
OpenSSH_7.4p1
OpenSSL 1.0.2k
升级后
linux CentOS
OpenSSH_9.7p1
OpenSSL 3.0.14
下载地址openssl:https://openssl-library.org/source/old/3.0/index.htmlopenssh:https://ftp.openbsd.org/pub/OpenBSD/OpenSSH/portable/注意事项
升级前务必保证虚拟机已经打快照或备份。注意:升级过程全程不要关闭xshell窗口!!!关闭后将无法ssh登录。注意:提前将openssh和openssl安装包上传到虚拟机!!!卸载ssh后将无法上传。注意:升级openssh后检查服务器ulimit值!!!安装OpenSSL
查看当前版本,并上传OpenSSH和OpenSSL
 图片
图片
安装编译环境:
复制
yum -y install perl-IPC-Cmd perl-Data-Dumper gcc gcc-c++ perl perl-devel zlib zlib-devel pam pam-devel1.
备份原openssl:
复制
whereis openssl
openssl: /usr/bin/openssl /usr/lib64/openssl /usr/share/man/man1/openssl.1ssl.gz
# 备份/usr/bin/openssl目录
cp /usr/bin/openssl /usr/bin/openssl.bak
# 备份/usr/lib64/openssl目录
cp /usr/lib64/openssl /usr/lib64/openssl.bak1.2.3.4.5.6.7.8.
解压安装openssl:
复制
tar -zxvf openssl-3.0.14.tar.gz # 解压安装包
mkdir -p /usr/local/openssl # 创建安装目录1.2.
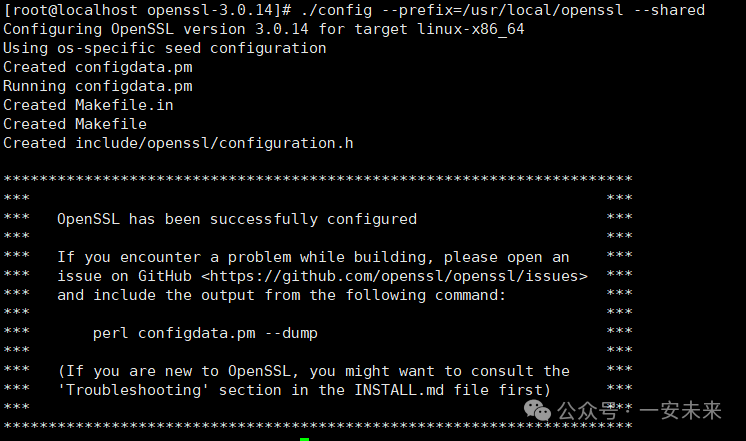
编译:
复制
cd /opt/ssh/openssl-3.0.14
./config --prefix=/usr/local/openssl --shared
make && make install1.2.3.
 图片
图片
更新openssl:
复制
# 建立软连接, 替换原有的openssl
ln -s /usr/local/openssl/bin/openssl /usr/bin/openssl
# 检查软连接建立情况
ls -al /usr/bin/openssl
lrwxrwxrwx. 1 root root 30 4月 10 13:31 /usr/bin/openssl -> /usr/local/openssl/bin/openssl
# 添加动态链接库
echo "/usr/local/openssl/lib64" >> /etc/ld.so.conf
# 刷新库
ldconfig1.2.3.4.5.6.7.8.9.10.11.
查看版本:
复制
[root@localhost openssl]# openssl version -a
OpenSSL 3.0.14 4 Jun 2024 (Library: OpenSSL 3.0.14 4 Jun 2024)
built on: Thu Apr 10 05:23:47 2025 UTC
platform: linux-x86_64
options: bn(64,64)
compiler: gcc -fPIC -pthread -m64 -Wa,--noexecstack -Wall -O3 -DOPENSSL_USE_NODELETE -DL_ENDIAN -DOPENSSL_PIC -DOPENSSL_BUILDING_OPENSSL -DNDEBUG
OPENSSLDIR: "/usr/local/openssl/ssl"
ENGINESDIR: "/usr/local/openssl/lib64/engines-3"
MODULESDIR: "/usr/local/openssl/lib64/ossl-modules"
Seeding source: os-specific
CPUINFO: OPENSSL_ia32cap=0xfffa3203478bffff:0xd11e4fb91.2.3.4.5.6.7.8.9.10.11.
安装OpenSSH
备份原有的ssh
复制
# 查看ssh服务所在的目录
whereis ssh
ssh: /usr/bin/ssh /etc/ssh /usr/share/man/man1/ssh.1.gz
# 备份/etc/ssh/目录
cp /etc/ssh/ /etc/ssh.bak
# 备份/usr/bin/ssh目录
cp /usr/bin/ssh /usr/bin/ssh.bak
whereis sshd
sshd: /usr/sbin/sshd /usr/share/man/man8/sshd.8.gz
# 备份/usr/sbin/shhd文件
cp /usr/sbin/sshd /usr/sbin/sshd.bak
# 备份/etc/init.d/shhd文件
cp /etc/init.d/sshd /etc/init.d/sshd.bak
# 注意/etc/init.d/sshd不存在,则无需备份
# /etc/pam.d/sshd文件
cp /etc/pam.d/sshd /etc/pam.d/sshd.bak
# 注意sshd不存在,则无需备份
卸载原有
rpm -e --nodeps `rpm -qa | grep openssh`1.2.3.4.5.6.7.8.9.10.11.12.13.14.15.16.17.18.19.20.21.22.23.24.25.26.
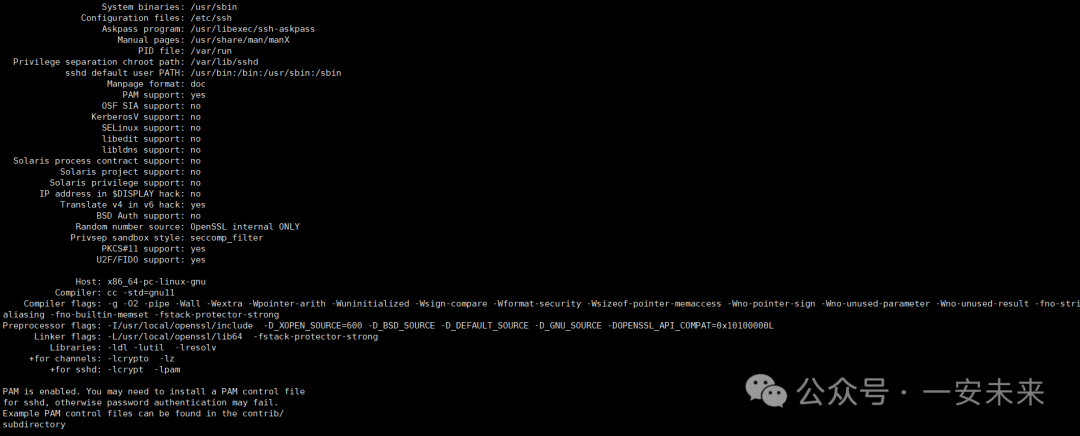
解压安装openssh:
复制
tar -zxvf openssh-9.7p1.tar.gz
cd openssh-9.7p1
# 使用默认安装目录的openssl
./configure --prefix=/usr --syscnotallow=/etc/ssh --with-md5-passwords --with-pam --with-privsep-path=/var/lib/sshd --without-hardening
# 使用指定安装目录的openssl(使用这个)
./configure --prefix=/usr --syscnotallow=/etc/ssh --with-md5-passwords --with-pam --with-tcp-wrappers --with-ssl-dir=/usr/local/openssl --with-privsep-path=/var/lib/sshd --without-hardening
# 使用指定安装目录的openssl和zlib
./configure --prefix=/usr --syscnotallow=/etc/ssh --with-md5-passwords --with-pam --with-tcp-wrappers --with-ssl-dir=/usr/local/openssl --with-zlib=/usr/local/zlib --with-privsep-path=/var/lib/sshd --without-hardening
# 编译安装
make && make install1.2.3.4.5.6.7.8.9.10.11.12.13.14.
 图片
图片
 图片
图片
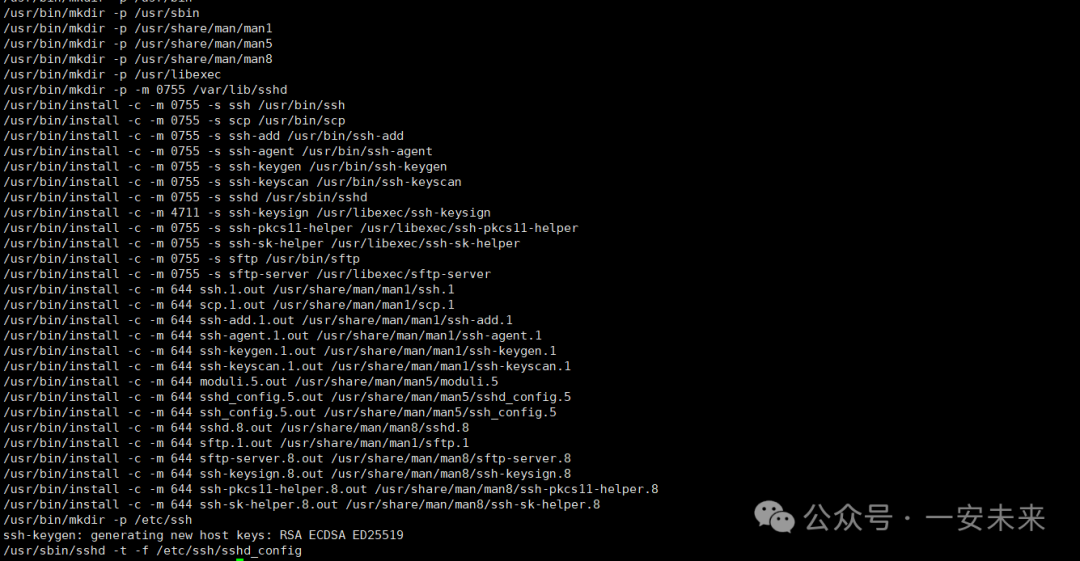
配置:
复制
mv /etc/pam.d/sshd.bak /etc/pam.d/sshd
# 修改ssh的相关秘钥文件的权限
chmod 600 /etc/ssh/ssh_host_rsa_key
chmod 600 /etc/ssh/ssh_host_ecdsa_key
chmod 600 /etc/ssh/ssh_host_ed25519_key
#修改允许远程登录
# 修改配置文件,允许root直接登录
echo"PasswordAuthentication yes" >> /etc/ssh/sshd_config
echo"PermitRootLogin yes" >> /etc/ssh/sshd_config
echo"UsePAM yes" >> /etc/ssh/sshd_config
#开机自启
cp -p /opt/ssh/openssh-9.7p1/contrib/redhat/sshd.init /etc/init.d/sshd
chmod +x /etc/init.d/sshd
chkconfig --add sshd
chkconfig sshd on
systemctl restart sshd
systemctl status sshd1.2.3.4.5.6.7.8.9.10.11.12.13.14.15.16.17.18.19.20.
验证OpenSSH服务:
复制
ssh -V
OpenSSH_9.7p1, OpenSSL 3.0.14 4 Jun 20241.2.
程序连接异常问题出现
升级完成后,发现ch.ethz.ssh2报错:
复制
java.io.IOException: There was a problem while connecting to 172.18.2.76:22
at ch.ethz.ssh2.Connection.connect(Connection.java:699)
at ch.ethz.ssh2.Connection.connect(Connection.java:490)
at org.example.ssh.SSH2Util.openConnection(SSH2Util.java:30)
at org.example.ssh.SSH2Util.main(SSH2Util.java:221)
Caused by: java.io.IOException: Key exchange was not finished, connection is closed.
at ch.ethz.ssh2.transport.KexManager.getOrWaitForConnectionInfo(KexManager.java:91)
at ch.ethz.ssh2.transport.TransportManager.getConnectionInfo(TransportManager.java:229)
at ch.ethz.ssh2.Connection.connect(Connection.java:655)
... 3 more
Caused by: java.io.IOException: Cannot negotiate, proposals do not match.
at ch.ethz.ssh2.transport.KexManager.handleMessage(KexManager.java:412)
at ch.ethz.ssh2.transport.TransportManager.receiveLoop(TransportManager.java:753)
at ch.ethz.ssh2.transport.TransportManager$1.run(TransportManager.java:468)
at java.lang.Thread.run(Thread.java:748)1.2.3.4.5.6.7.8.9.10.11.12.13.14.15.
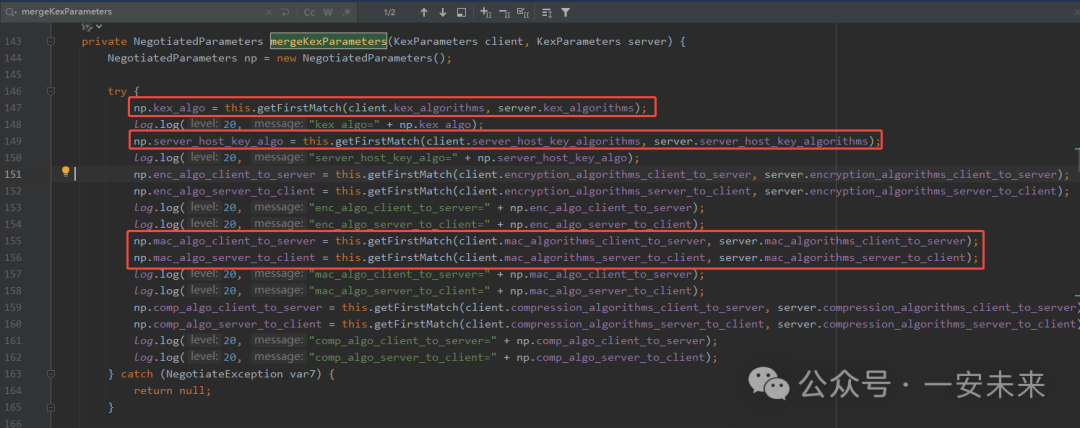
通过报错信息可知,问题出在密钥交换阶段,客户端和服务端的提议不匹配。找到ch.ethz.ssh2.transport.KexManager类,其中有个方法mergeKexParameters,这个就是匹配服务端客户端两边相关参数通用的算法,底层调用getFirstMatch去比较二者相同的算法。
 图片
图片
在ch.ethz.ssh2.crypto.CryptoWishlist类中查看默认支持的算法,如KexAlgorithms、HostKeyAlgorithms、MACs等参数的值。发现默认算法列表可能与升级后的OpenSSH和OpenSSL不兼容。
查看支持算法:
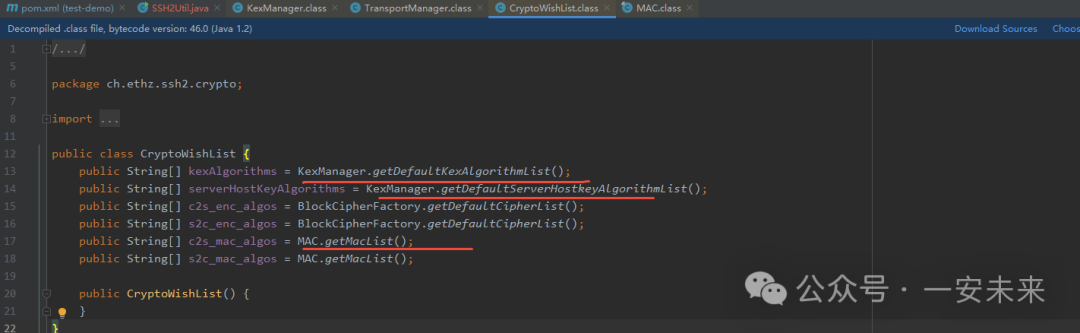 图片
图片
复制
public static final String[] getDefaultKexAlgorithmList() {
return new String[]{"diffie-hellman-group-exchange-sha1", "diffie-hellman-group14-sha1", "diffie-hellman-group1-sha1"};
}
public static final String[] getDefaultServerHostkeyAlgorithmList() {
return new String[]{"ssh-rsa", "ssh-dss"};
}
public static final String[] getMacList() {
return new String[]{"hmac-sha1-96", "hmac-sha1", "hmac-md5-96", "hmac-md5"};
}1.2.3.4.5.6.7.8.9.10.11.
补充一个较完整的算法配置,在相关配置文件(/etc/ssh/sshd_config)中添加以下内容::
复制
KexAlgorithms diffie-hellman-group1-sha1,diffie-hellman-group14-sha1,diffie-hellman-group-exchange-sha1,diffie-hellman-group-exchange-sha256,ecdh-sha2-nistp256,ecdh-sha2-nistp384,ecdh-sha2-nistp521,diffie-hellman-group1-sha1,curve25519-sha256@libssh.org
HostbasedAcceptedKeytypes ssh-ed25519,ssh-ed25519-cert-v01@openssh.com,rsa-sha2-256,rsa-sha2-512
CASignatureAlgorithms ssh-ed25519,sk-ssh-ed25519@openssh.com,rsa-sha2-512,rsa-sha2-256
HostKeyAlgorithms ssh-ed25519,ssh-ed25519-cert-v01@openssh.com,rsa-sha2-256,rsa-sha2-512,ssh-rsa,ssh-dss
PubkeyAcceptedKeyTypes ssh-ed25519,ssh-ed25519-cert-v01@openssh.com,rsa-sha2-256,rsa-sha2-512,ssh-rsa
MACs hmac-sha2-512,hmac-sha2-512-etm@openssh.com,hmac-sha2-256,hmac-sha2-256-etm@openssh.com,hmac-sha1-961.2.3.4.5.6.
添加完成后,重启SSH服务,程序连接异常问题得到解决
最后附上ssh工具类:复制
public class SSH2Util {
private static String DEFAULT_CHARSET = "UTF-8";
private Connection connection;
private String hostname;
private int port;
private String username;
private String password;
public SSH2Util(String hostname, int port, String username, String password) {
this.hostname = hostname;
this.port = port;
this.username = username;
this.password = password;
}
/**
* 连接到 SSH 服务器
* @return 是否连接成功
* @throws IOException 连接过程中发生的 I/O 异常
*/
public boolean connect() throws IOException {
connection = new Connection(hostname, port);
connection.connect();
return connection.authenticateWithPassword(username, password);
}
/**
* 执行 SSH 命令
* @param command 要执行的命令
* @return 命令执行结果
* @throws IOException 执行命令过程中发生的 I/O 异常
*/
public String executeCommand(String command) throws IOException {
if (connection == null ||!connection.isAuthenticationComplete()) {
throw new IllegalStateException("未连接到 SSH 服务器");
}
Session session = connection.openSession();
session.execCommand(command);
InputStream stdout = new StreamGobbler(session.getStdout());
BufferedReader reader = new BufferedReader(new InputStreamReader(stdout,DEFAULT_CHARSET));
StringBuilder result = new StringBuilder();
String line;
while ((line = reader.readLine()) != null) {
result.append(line).append("\n");
}
session.close();
return result.toString();
}
/**
* 上传文件到 SSH 服务器
* @param localFilePath 本地文件路径
* @param remoteFilePath 远程文件路径
* @throws IOException 上传过程中发生的 I/O 异常
*/
public void uploadFile(String localFilePath, String remoteFilePath) throws IOException {
if (connection == null ||!connection.isAuthenticationComplete()) {
throw new IllegalStateException("未连接到 SSH 服务器");
}
SCPClient scpClient = connection.createSCPClient();
scpClient.put(localFilePath, remoteFilePath);
}
/**
* 从 SSH 服务器下载文件
* @param remoteFilePath 远程文件路径
* @param localFilePath 本地文件路径
* @throws IOException 下载过程中发生的 I/O 异常
*/
public void downloadFile(String remoteFilePath, String localFilePath) throws IOException {
if (connection == null ||!connection.isAuthenticationComplete()) {
throw new IllegalStateException("未连接到 SSH 服务器");
}
SCPClient scpClient = connection.createSCPClient();
scpClient.get(remoteFilePath, localFilePath);
}
/**
* 关闭 SSH 连接
*/
public void close() {
if (connection != null) {
connection.close();
}
}
public static void main(String[] args) throws IOException {
SSH2Util sshUtil = new SSH2Util("your_hostname", 22, "your_username", "your_password");
try {
if (sshUtil.connect()) {
System.out.println("连接成功");
String result = sshUtil.executeCommand("ls -l");
System.out.println("命令执行结果:\n" + result);
sshUtil.uploadFile("local_file_path", "remote_file_path");
sshUtil.downloadFile("remote_file_path", "local_file_path");
} else {
System.out.println("连接失败");
}
} catch (IOException e) {
e.printStackTrace();
} finally {
sshUtil.close();
}
}
}1.2.3.4.5.6.7.8.9.10.11.12.13.14.15.16.17.18.19.20.21.22.23.24.25.26.27.28.29.30.31.32.33.34.35.36.37.38.39.40.41.42.43.44.45.46.47.48.49.50.51.52.53.54.55.56.57.58.59.60.61.62.63.64.65.66.67.68.69.70.71.72.73.74.75.76.77.78.79.80.81.82.83.84.85.86.87.88.89.90.91.92.93.94.95.96.97.98.99.100.101.102.103.104.105.106.
THE END