Ansible Playbook 讲解与实战操作
一、概述
playbook与ad-hoc相比,是一种完全不同的运用ansible的方式,类似与saltstack的state状态文件。ad-hoc无法持久使用,playbook可以持久使用。playbook是由一个或多个play组成的列表,play的主要功能在于将事先归并为一组的主机装扮成事先通过ansible中的task定义好的角色。从根本上来讲,所谓的task无非是调用ansible的一个module。将多个play组织在一个playbook中,即可以让它们联合起来按事先编排的机制完成某一任务。参考文档:https://ansible-tran.readthedocs.io/en/latest/docs/playbooks.html
Ansible 的基础介绍和环境部署可以参考我这篇文章:Ansible 介绍与实战操作演示
二、playbook 核心元素
Hosts执行的远程主机列表Tasks任务集Varniables内置变量或自定义变量在playbook中调用Templates模板,即使用模板语法的文件,比如配置文件等Handlers和notity结合使用,由特定条件触发的操作,满足条件方才执行,否则不执行Tags标签,指定某条任务执行,用于选择运行playbook中的部分代码。三、playbook 语法(yaml)
playbook使用yaml语法格式,后缀可以是yaml,也可以是yml。YAML( /ˈjæməl/ )参考了其他多种语言,包括:XML、C语言、Python、Perl以及电子邮件格式RFC2822,Clark Evans在2001年5月在首次发表了这种语言,另外Ingy döt Net与OrenBen-Kiki也是这语言的共同设计者。YAML格式是类似JSON的文件格式。YAML用于文件的配置编写,JSON多用于开发设计。1)YAML 介绍
1、YAML 格式如下文件的第一行应该以“---”(三个连字符)开始,表明YAML文件的开始。在同一行中,#之后的内容表示注释,类似于shell,python和ruby。YAML中的列表元素以“-”开头并且跟着一个空格。后面为元素内容。同一个列表之中的元素应该保持相同的缩进,否则会被当做错误处理。play中hosts、variables、roles、tasks等对象的表示方法都是以键值中间以“:”分隔表示,并且“:”之后要加一个空格。2、playbooks yaml配置文件解释复制Hosts:运行指定任务的目标主机
remoute_user:在远程主机上执行任务的用户;
sudo_user:tasks:任务列表
tasks的具体格式:
tasks: - name:TASK_NAME
module:arguments
notify:HANDLER_NAME
handlers: - name:HANDLER_NAME
module:arguments
##模块,模块参数:
格式如下:
(1)action:module arguments
(2) module:arguments
注意:shell和command模块后直接加命令,而不是key=value类的参数列表
handlers:任务,在特定条件下触发;接受到其他任务的通知时被触发;1.2.3.4.5.6.7.8.9.10.11.12.13.14.15.16.17.18.19.20.21.22.23.web
remote_user:root
tasks: - name:install nginx ##安装模块,需要在被控主机里加上nginx的源
yum: name=nginx state=present
- name: copy nginx.conf ##复制nginx的配置文件过去,需要在本机的/tmp目录下编辑nginx.conf copy: src=/tmp/nginx.conf dest=/etc/nginx/nginx.conf backup=yes
notify: reload #当nginx.conf发生改变时,通知给相应的handlers
tags:reloadnginx #打标签
- name:start nginx service #服务启动模块
service: name=nginx state=started
tags:startnginx #打标签
handlers: - name:reload
service: name=nginx state=restarted1.2.3.4.5.6.7.8.9.10.11.12.13.14.15.16.17.2)variables 变量
variables变量有四种定义方法。如下:
1、facts:可以直接调用ansible中有setup模块,这个模块就是通过facts组件来实现的,主要是节点本身的一个系统信息,bios信息,网络,硬盘等等信息。这里的variables也可以直接调用facts组件的facters我们可以使用setup模块来获取,然后直接放入我们的剧本之中调用即可。

常用的几个参数:
复制ansible_all_ipv4_addresses # ipv4的所有地址
ansible_all_ipv6_addresses # ipv6的所有地址
ansible_date_time # 获取到控制节点时间
ansible_default_ipv4 # 默认的ipv4地址
ansible_distribution # 系统
ansible_distribution_major_version # 系统的大版本
ansible_distribution_version # 系统的版本号
ansible_domain #系统所在的域
ansible_env #系统的环境变量
ansible_hostname #系统的主机名
ansible_fqdn #系统的全名
ansible_machine #系统的架构
ansible_memory_mb #系统的内存信息
ansible_os_family # 系统的家族
ansible_pkg_mgr # 系统的包管理工具
ansible_processor_cores #系统的cpu的核数(每颗)ansible_processor_count #系统cpu的颗数
ansible_processor_vcpus #系统cpu的总个数=cpu的颗数*CPU的核数
ansible_python # 系统上的python1.2.3.4.5.6.7.8.9.10.11.12.13.14.15.16.17.18.19.搜索

自定义变量有两种方式
通过命令行传入使用playbook定义变量,实例如下:
:
- name: install {{ rpmname}}
yum: name={{ rpmname }} state=present - name: copy {{ rpmname }}.conf copy: src=/tmp/{{ rpmname }}.conf dest=/etc/{{ rpmname }}/{{ rpmname }}.conf backup=yes notify: reload tags: reload{{ rpmname}}
- name: start {{ rpmname }} service service: name={{ rpmname }} state=started tags: start{{ rpmname}}
handlers:
- name: reload service: name={{ rpmname }} state=restarted1.2.3.4.5.6.7.8.9.10.11.12.13.14.15.16.17.18.使用:
keepalived
ansible-playbook nginx.yml --extra-vars rpmname=keepalived1.2.复制##在playbook中定义变量如下:
vars:
- var1:value1
- var2: value21.2.3.4.使用:
web
remote_user:root
vars: - rpmname:keepalived
tasks: - name: install {{ rpmname }} yum: name={{ rpmname }} state=present
- name: copy {{ rpmname }}.conf copy: src=/tmp/{{ rpmname }}.conf dest=/etc/{{ rpmname }}/{{ rpmname }}.conf backup=yes
notify:reload
tags: reload{{ rpmname }} - name: start {{ rpmname }}service
service: name={{ rpmname }} state=started
tags: start{{ rpmname }} handlers: - name:reload
service: name={{ rpmname }} state=restarted1.2.3.4.5.6.7.8.9.10.11.12.13.14.15.16.17.18.19.下面介绍roles会使用roles传递变量,小伙伴可以翻到下面看详解讲解。
4、 Host Inventory可以在主机清单中定义,方法如下:
复制#向不同的主机传递不同的变量
IP/HOSTNAME varaiable=value var2=value2
#向组中的主机传递相同的变量
[groupname:vars]variable=value1.2.3.4.5.6.3)流程控制
1、用when 来表示的条件判断web
remote_user:root#代表用root用户执行,默认是root,可以省略
tasks: - name:createfile
copy: content="test3" dest=/opt/p1.yml when: a==3 - name:createfile
copy: content="test4" dest=/opt/p1.yml when: a==41.2.3.4.5.6.7.8.9.如果a"3",就将“test3”,写入到web组下被管控机的/opt/p1.yml中,
如果a"4",就将“test4”,写入到web组下被管控机的/opt/p1.yml中。执行
复制# 语法校验
ansible-playbook --syntax-check p1.yml#执行
ansible-playbook -e a="3" p1.yml1.2.3.4.5.web
tasks: - name:installnginx
yum: name=nginx
- name:copyfile
copy: src=/etc/nginx/nginx.conf dest=/etc/nginx/nginx.conf tags:copyfile
- name:start
service: name=nginx static=restarted1.2.3.4.5.6.7.8.9.执行
复制# 语法校验
ansible-playbook --syntax-check p2.yml#执行
ansible-playbook -t copyfile p2.yml 1.2.3.4.5.创建三个用户
web
tasks: - name:createruser
user: name={{ item }} with_items: -shy1
-shy2
-shy3
- name:creategroup
group: name={{ item }} with_items: -group1
-group2
- group3 1.2.3.4.5.6.7.8.9.10.11.12.13.14.执行
复制#语法校验
ansible-playbook --syntax-check p3.yml#执行
ansible-playbook p3.yml 1.2.3.4.5.用户shy1的属组是group1,用户shy2的属组是group2,用户shy3的属组是group3
web
tasks: - name:creategroup
group: name={{item}} with_items: -group3
-group4
-group5
- name:createuser
user: name={{item.user}} group={{item.group}} with_items: - {user: shy3,group: group3} - {user: shy4,group: group4} - {user: shy5,group: group5}1.2.3.4.5.6.7.8.9.10.11.12.13.14.执行
复制#语法校验
ansible-playbook --syntax-check p4.yml#执行
ansible-playbook p4.yml 1.2.3.4.5.4)模板 templates
模板是一个文本文件,嵌套有脚本(使用模板编程语言编写)Jinja2是python的一种模板语言,以Django的模板语言为原本该模板支持:
复制字符串:使用单引号或双引号;
数字:整数,浮点数;
列表:[item1, item2, ...] 元组:(item1, item2, ...) 字典:{key1:value1, key2:value2, ...} 布尔型:true/false算术运算:
+, -, *, /, //, %, **比较操作:
==, !=, >, >=, <, <=逻辑运算:
and, or, not1.2.3.4.5.6.7.8.9.10.11.12.【示例】
1、定义模板#设置nginx服务的系统使用用户
worker_processes {{ ansible_processor_vcpus }};#工作进程数
error_log /var/log/nginx/error.log warn;#nginx的错误日志
pid /var/run/nginx.pid;#nginx启动时候的pid
events { worker_connections 1024;#每个进程允许的最大连接数
}http {#http请求配置,一个http可以包含多个server
#定义 Content-Type
include /etc/nginx/mime.types; default_type application/octet-stream;#日志格式 此处main与access_log中的main对应
#$remote_addr:客户端地址
#$remote_user:http客户端请求nginx认证的用户名,默认不开启认证模块,不会记录
#$timelocal:nginx的时间
#$request:请求method + 路由 +http协议版本
#status:http reponse 状态码
#body_bytes_sent:response body的大小
#$http_referer:referer头信息参数,表示上级页面
#$http_user_agent:user-agent头信息参数,客户端信息
#$http_x_forwarded_for:x-forwarded-for头信息参数
log_format main $http_user_agent $remote_addr - $remote_user [$time_local] "$request" $status $body_bytes_sent "$http_referer" "$http_user_agent" "$http_x_forwarded_for"; #访问日志,后面的main表示使用log_format中的main格式记录到access.log中
access_log /var/log/nginx/access.log main;#nginx的一大优势,高效率文件传输
sendfile on; #tcp_nopush on;#客户端与服务端的超时时间,单位秒
keepalive_timeout 65; #gzip on; server {#http服务,一个server可以配置多个location
listen {{ nginxport }};#服务监听端口
server_name localhost;#主机名、域名
#charset koi8-r; #access_log /var/log/nginx/host.access.log main; location / { root /usr/share/nginx/html;#页面存放目录
index index.html index.htm;#默认页面
} #error_page 404 /404.html; # 将500 502 503 504的错误页面重定向到 /50x.html error_page 500 502 503 504 /50x.html; location = /50x.html {#匹配error_page指定的页面路径
root /usr/share/nginx/html;#页面存放的目录
} # proxy the PHP scripts to Apache listening on 127.0.0.1:80#
#location ~ \.php$ { # proxy_pass http://127.0.0.1; #} # pass the PHP scripts to FastCGI server listening on 127.0.0.1:9000#
#location ~ \.php$ { # root html; # fastcgi_pass 127.0.0.1:9000; # fastcgi_index index.php; # fastcgi_param SCRIPT_FILENAME /scripts$fastcgi_script_name; # include fastcgi_params; #} # deny access to .htaccess files, if Apaches document root # concurs with nginxs one
#
#location ~ /\.ht { # deny all; #} } include /etc/nginx/conf.d/*.conf;}1.2.3.4.5.6.7.8.9.10.11.12.13.14.15.16.17.18.19.20.21.22.23.24.25.26.27.28.29.30.31.32.33.34.35.36.37.38.39.40.41.42.43.44.45.46.47.48.49.50.51.52.53.54.55.56.57.58.59.60.61.62.63.64.65.66.67.68.69.70.71.72.73.74.75.76.77.78.79.80.81.82.83.84.85.86.web
remote_user:root
vars: - rpmname:nginx
- nginxport: 8088 tasks: - name: install {{ rpmname }} yum: name={{ rpmname }} state=present
- name: copy {{ rpmname }}.conf copy: src=/tmp/{{ rpmname }}.conf dest=/etc/{{ rpmname }}/{{ rpmname }}.conf backup=yes
notify:reload
tags: reload{{ rpmname }} - name: start {{ rpmname }}service
service: name={{ rpmname }} state=started
tags: start{{ rpmname }} handlers: - name:reload
service: name={{ rpmname }} state=restarted1.2.3.4.5.6.7.8.9.10.11.12.13.14.15.16.17.18.19.20.使用
copy与template的区别
copy模块不替代参数,template模块替代参数template的参数几乎与copy的参数完全相同5)handlers(触发事件)
触发
handlers:触发的动作1.2.使用上场景:修改配置文件时
【示例】 正常情况时handlers是不会执行的
web
tasks: - name:installredis
yum: name=redis
- name:copyfile
template: src=redis.conf dest=/etc/redis.conf tags:copyfile
notify:restart
- name:start
service: name=redis state=started
handlers: - name:restart
service: name=redis1.2.3.4.5.6.7.8.9.10.11.12.13.执行
6)roles
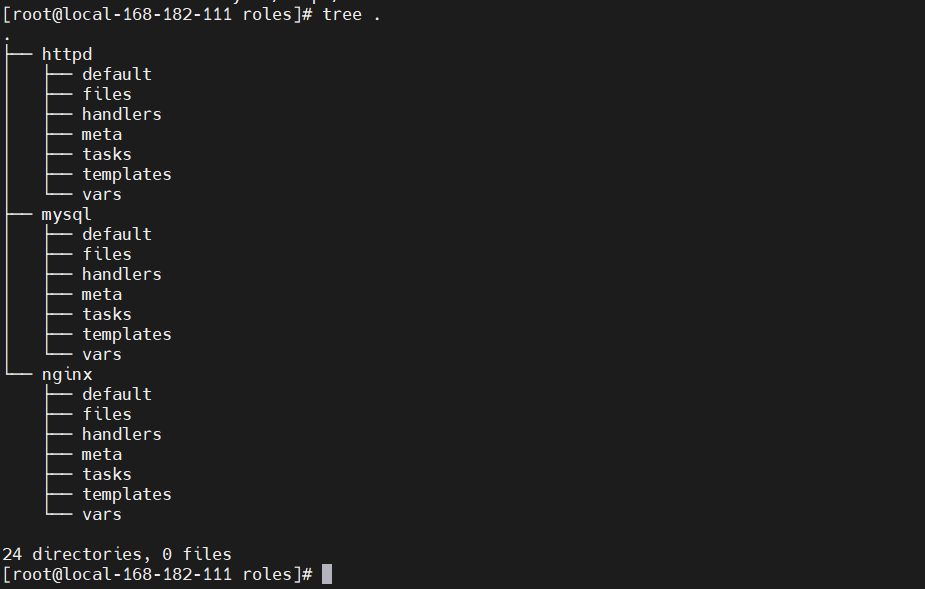
1、roles介绍与优势一般情况下将roles写在/etc/ansible/roles中,也可以写在其他任意位置(写在其他位置要自己手动建立一个roles文件夹)
对于以上所有方式有个缺点就是无法实现同时部署web、database、keepalived等不同服务或者不同服务器组合不同的应用就需要写多个yaml文件,很难实现灵活的调用roles用于层次性,结构化地组织playbook。roles能够根据层次结果自动装载变量文件、tasks以及handlers等。要使用roles只需要在playbook中使用include指令即可。简单来讲,roles就是通过分别将变量(vars)、文件(files)、任务(tasks)、模块(modules)以及处理器(handlers)放置于单独的目录中,并且可以便捷的include它们地一种机制。角色一般用于基于主机构建服务的场景中,但是也可以用于构建守护进程等场景中。42、目录结构创建目录
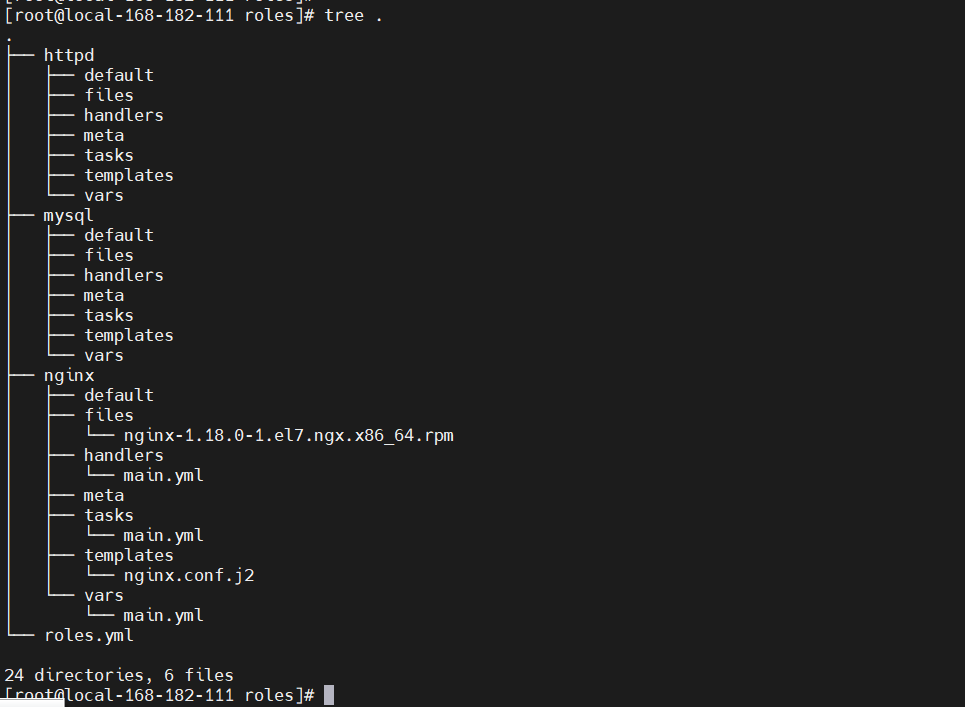
【1】创建目录
【2】定义配置文件
先下载nginx rpm部署包
cp
copy: src=nginx-1.18.0-1.el7.ngx.x86_64.rpm dest=/tmp/nginx-1.18.0-1.el7.ngx.x86_64.rpm- name:install
yum: name=/tmp/nginx-1.18.0-1.el7.ngx.x86_64.rpm state=latest
- name:conf
template: src=nginx.conf.j2 dest=/etc/nginx/nginx.conf tags:nginxconf
notify:new conf to reload
- name:start service
service: name=nginx state=started enabled=true1.2.3.4.5.6.7.8.9.10.#设置nginx服务的系统使用用户
worker_processes {{ ansible_processor_vcpus }};#工作进程数
error_log /var/log/nginx/error.log warn;#nginx的错误日志
pid /var/run/nginx.pid;#nginx启动时候的pid
events { worker_connections 1024;#每个进程允许的最大连接数
}http {#http请求配置,一个http可以包含多个server
#定义 Content-Type
include /etc/nginx/mime.types; default_type application/octet-stream;#日志格式 此处main与access_log中的main对应
#$remote_addr:客户端地址
#$remote_user:http客户端请求nginx认证的用户名,默认不开启认证模块,不会记录
#$timelocal:nginx的时间
#$request:请求method + 路由 +http协议版本
#status:http reponse 状态码
#body_bytes_sent:response body的大小
#$http_referer:referer头信息参数,表示上级页面
#$http_user_agent:user-agent头信息参数,客户端信息
#$http_x_forwarded_for:x-forwarded-for头信息参数
log_format main $http_user_agent $remote_addr - $remote_user [$time_local] "$request" $status $body_bytes_sent "$http_referer" "$http_user_agent" "$http_x_forwarded_for"; #访问日志,后面的main表示使用log_format中的main格式记录到access.log中
access_log /var/log/nginx/access.log main;#nginx的一大优势,高效率文件传输
sendfile on; #tcp_nopush on;#客户端与服务端的超时时间,单位秒
keepalive_timeout 65; #gzip on; server {#http服务,一个server可以配置多个location
listen {{ nginxport }};#服务监听端口
server_name localhost;#主机名、域名
#charset koi8-r; #access_log /var/log/nginx/host.access.log main; location / { root /usr/share/nginx/html;#页面存放目录
index index.html index.htm;#默认页面
} #error_page 404 /404.html; # 将500 502 503 504的错误页面重定向到 /50x.html error_page 500 502 503 504 /50x.html; location = /50x.html {#匹配error_page指定的页面路径
root /usr/share/nginx/html;#页面存放的目录
} # proxy the PHP scripts to Apache listening on 127.0.0.1:80#
#location ~ \.php$ { # proxy_pass http://127.0.0.1; #} # pass the PHP scripts to FastCGI server listening on 127.0.0.1:9000#
#location ~ \.php$ { # root html; # fastcgi_pass 127.0.0.1:9000; # fastcgi_index index.php; # fastcgi_param SCRIPT_FILENAME /scripts$fastcgi_script_name; # include fastcgi_params; #} # deny access to .htaccess files, if Apaches document root # concurs with nginxs one
#
#location ~ /\.ht { # deny all; #} } include /etc/nginx/conf.d/*.conf;}1.2.3.4.5.6.7.8.9.10.11.12.13.14.15.16.17.18.19.20.21.22.23.24.25.26.27.28.29.30.31.32.33.34.35.36.37.38.39.40.41.42.43.44.45.46.47.48.49.50.51.52.53.54.55.56.57.58.59.60.61.62.63.64.65.66.67.68.69.70.71.72.73.74.75.76.77.78.79.80.81.82.83.84.85.86.new conf to reload
service: name=nginx state=restarted1.2.web
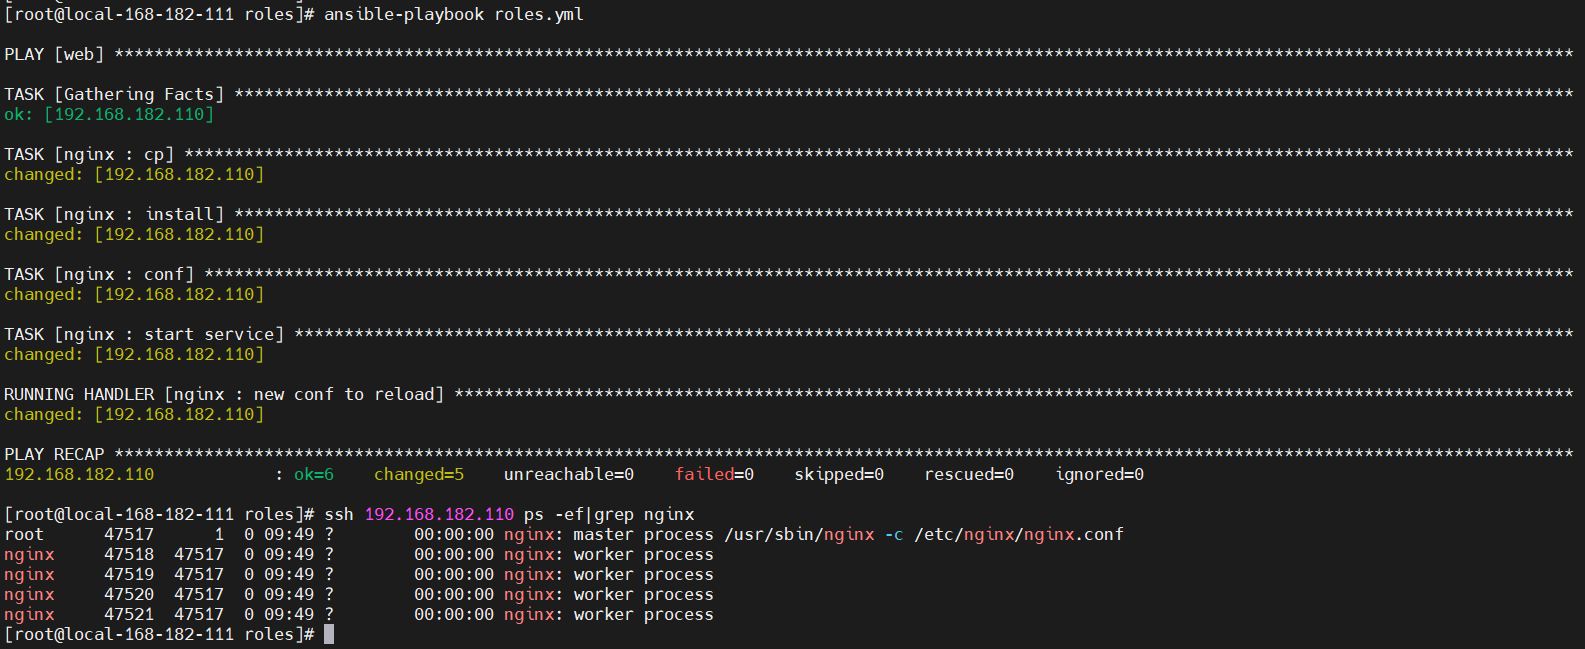
remote_user:root
roles: - nginx1.2.3.4.最后的目录结构如下:
执行